Best Homemade Bread Recipe for Beginners
Water is a fundamental component in bread-making. The temperature of the water directly impacts the yeast's activity and the overall texture of the dough. Using lukewarm water, approximately 105-115 degrees Fahrenheit, encourages optimal yeast fermentation and a more even rise. Proper hydration of the flour is essential for the development of gluten, which is crucial for the bread's structure.
The right amount of water is critical to achieving the desired consistency of the dough. Too little water will result in a dry, crumbly loaf, while too much will lead to a sticky, uneven texture. Experimentation is key to finding the perfect hydration level for your preferred bread recipe and ingredients.
Yeast: The Leavened Powerhouse
Active dry yeast is the leavening agent that makes your bread rise. Following the package instructions for activation is paramount for a successful rise. Fresh yeast, while requiring more care, can yield a unique flavor profile. Understanding the different types of yeast and their specific needs will allow you to tailor your technique for optimal results.
Salt: The Flavor Enhancer
Salt plays a vital role in bread-making. It sharpens the flavors of the other ingredients and regulates the yeast's activity. Too little salt can result in a bland taste, while too much can hinder the yeast's fermentation. The correct amount of salt is essential for a balanced and flavorful loaf.
Essential Baking Tools
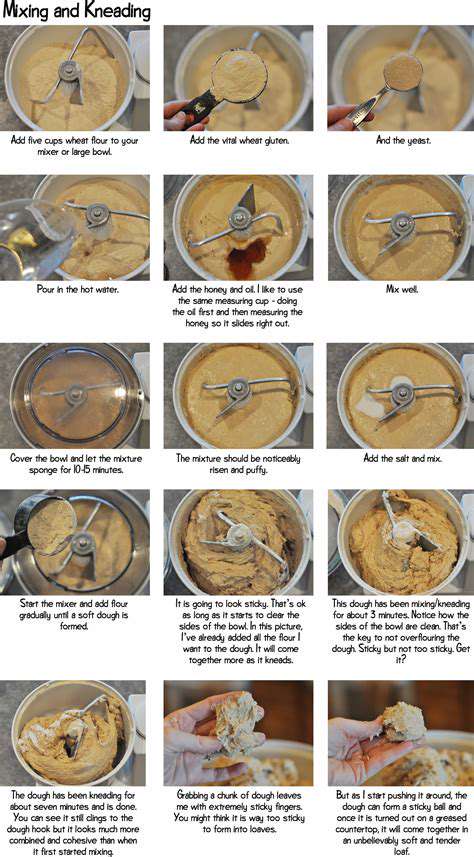
A mixing bowl, a wooden spoon or spatula, and a large measuring cup and spoon are essential for preparing the dough. A stand mixer with a dough hook is very helpful, especially for larger batches or if you want to save time. An accurate kitchen scale is essential for precise measurements, which can greatly impact the outcome of the baked bread. A baking sheet, and a pizza stone or Dutch oven, are essential tools for achieving a crispy crust.
Resting and Shaping the Dough
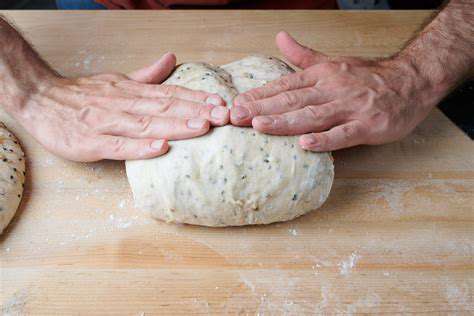
Allowing the dough to rest and rise is essential for developing gluten and creating a light and airy texture. Proper kneading techniques are also crucial for developing the gluten, which will give the bread its structure and elasticity. The resting period allows the yeast to activate, producing gases that create the rise. Different techniques for shaping the dough can affect the final appearance and texture of your bread.
Oven Temperature and Baking Time
Maintaining a consistent oven temperature is crucial for achieving a perfectly baked loaf. Preheating your oven to the correct temperature, as indicated in the recipe, is essential for a consistent bake. The baking time varies depending on the recipe, the size of the loaf, and the type of oven. Using a baking thermometer can ensure the oven is reaching the specified temperature, which ensures the bread is baked properly.
The Proofing Process: Letting the Dough Rise
Understanding the Importance of Proofing
Proofing is a crucial step in bread-making, often overlooked by beginners. It's the time when the yeast, a tiny living organism, consumes the sugars in the dough, producing carbon dioxide gas. This gas is what makes the bread rise and gives it its characteristic airy texture. Without proper proofing, your bread will likely be dense and flat, lacking the delightful chewiness and satisfying rise that good bread should have. Understanding and mastering this stage is essential for baking delicious homemade loaves.
Effective proofing relies on the right temperature and humidity levels, as these factors directly influence the yeast's activity. The environment for proofing needs to be carefully monitored and controlled to ensure optimal yeast performance. This control is a key element in the success of your baking journey.
Yeast Activation: A Vital First Step
Before you even begin mixing your dough, it's essential to activate your yeast. This simple process ensures that your yeast is healthy and ready to work its magic. A good yeast activation ensures that the bread will rise properly and give you that desired texture. Incorrect activation can lead to a sluggish rise or no rise at all, resulting in a disappointing loaf.
The Ideal Proofing Environment
The ideal proofing environment is typically a warm, humid place, somewhere between 75-85°F (24-29°C). Maintaining a consistent temperature is crucial for a predictable rise. A warm spot, away from drafts, can assist in the proofing process and keep the yeast happy.
Creating a humid environment is equally important. A humid environment helps the yeast to thrive and create that satisfying rise. You can achieve this by covering the bowl with a damp kitchen towel or placing a container of water nearby.
Recognizing the Signs of a Good Proof
Knowing when your dough has proofed correctly is an important skill to develop. The dough should have visibly risen, appearing puffy and almost doubled in size. It should also feel springy and light when gently pressed. A good proof is the sign of a healthy and active yeast, guaranteeing your bread a beautiful rise and a delightful texture.
Troubleshooting Common Proofing Problems
Sometimes, despite our best efforts, proofing can go awry. If your dough isn't rising, there are several possible reasons. Maybe the yeast is old or inactive. Perhaps the temperature or humidity is not optimal. Careful observation and attention to detail are crucial in identifying and resolving these issues.
If your dough is rising too quickly, it might be too warm or the yeast is too active. Adjusting the environment or waiting for a slower rise can help prevent this problem. Understanding these potential problems is key to perfecting your bread-making technique.
Factors Affecting Proofing Time
Several factors influence the length of time it takes for your dough to proof. The type of flour used, the amount of sugar in the recipe, and the temperature of the ingredients all play a role. Understanding these variables helps you adjust your proofing time accordingly. Careful observation and adjustments are essential for consistent results.
Proofing Techniques: Different Methods
Different bread recipes may call for different proofing methods. Some may require a first rise and a second, while others may only need one. Understanding the specific instructions for your recipe will ensure you are following the best approach to get a successful proof. This understanding is essential to avoid errors that could compromise the final product.
Experimentation with different techniques and paying close attention to the nuances of each method will lead to a deeper appreciation and mastery of the proofing process.
Individuals experiencing health anxiety often report a wide range of physical symptoms, which can be incredibly distressing and confusing. These symptoms can mimic genuine medical conditions, leading to significant worry and fear of a serious illness. Physical symptoms can include persistent headaches, stomach aches, fatigue, and shortness of breath, among others. These symptoms can be unpredictable and fluctuate in intensity, further fueling the anxiety and making it difficult to distinguish from actual illness.
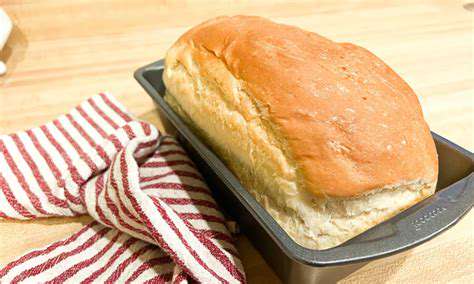
Cooling and Enjoying Your Homemade Bread
Crafting the Perfect Atmosphere
Creating a cool and inviting atmosphere is crucial to maximizing the enjoyment of your homemade treats. Consider the ambiance you want to evoke. Is it a relaxed afternoon tea party, a cozy evening gathering, or a casual snack break? The lighting, music, and even the subtle scents you introduce can significantly influence the overall experience.
Careful consideration of these elements can transform a simple snack into a memorable event. Think about using soft lighting, perhaps with candles or string lights, to create a warm and inviting glow. Choose music that complements the mood you're aiming for, whether it's upbeat and lively or calming and soothing.
Optimizing Your Cooling Techniques
Proper cooling is essential to preventing bacterial growth and ensuring your homemade treats are safe to eat. Employing effective cooling methods will not only enhance the taste and texture of your creations but also contribute to their overall appeal.
Different types of treats require different cooling strategies. For example, cookies may benefit from a short period on a wire rack before being stored in an airtight container. Cakes, on the other hand, might need a longer cooling time on a cooling rack or in the refrigerator.
Exploring Diverse Cooling Solutions
Beyond basic refrigeration, explore alternative cooling methods to enhance the final product. Freezing treats for a short period before serving can create a delightful textural contrast and a burst of refreshing flavor.
Quick-chilling methods, like using an ice bath or placing treats in the freezer for a few minutes, can be incredibly effective. This is especially beneficial for desserts that are prone to melting or becoming soggy.
The Importance of Proper Storage
Once cooled, appropriate storage is paramount to maintaining the quality and freshness of your homemade treats. Using airtight containers helps to prevent moisture loss and unwanted flavors from transferring.
Proper storage is vital to preserving the quality of your homemade creations. This will ensure that your hard work and dedication to culinary excellence are rewarded with a delicious and enjoyable experience for everyone.
Temperature Management for Maximum Flavor
Maintaining the ideal temperature throughout the cooling process is crucial for preserving the intended flavor profile of your homemade treats. A slow and gradual cooling process can help retain moisture and prevent the loss of delicate aromas.
Understanding the temperature sensitivity of various ingredients and treats will allow you to fine-tune your cooling methods for optimal results. This knowledge will allow you to create desserts that are both delicious and appealing to the eye.
Serving Considerations for Enhanced Enjoyment
The presentation of your homemade treats plays a significant role in the overall enjoyment of the experience. Carefully consider how you'll serve them to create a visually appealing and inviting display. Using attractive plates or platters can elevate the presentation and enhance the overall experience.
Presentation and serving style contribute greatly to the overall enjoyment. Consider using attractive garnishes or arranging the treats in an aesthetically pleasing manner. This can transform a simple snack into a delightful and memorable event.
Presentation for a Memorable Experience
Presentation is more than just aesthetics; it also plays a critical role in enhancing the overall sensory experience of enjoying homemade treats. Using attractive platters, bowls, or serving dishes can elevate the presentation and enhance the dining experience.
A well-presented dessert or snack can be a work of art, enhancing the enjoyment and creating lasting positive impressions. This is especially true when sharing these treats with loved ones, creating a social experience that is both memorable and satisfying.
Read more about Best Homemade Bread Recipe for Beginners
![Best Mexican Restaurants in [City]](/static/images/28/2025-05/FineDiningMeetsMexicanFlair3AAnElevatedCulinaryExperience.jpg)
![Top Food Trucks in [City] You Need to Find](/static/images/28/2025-05/GourmetPizzaPerfection3A5BTruckName5D.jpg)


![Review: The [Specific Brand] Sous Vide Cooker](/static/images/28/2025-06/ValueforMoney3AIsitaWorthyInvestment3F.jpg)