Best Sugar Cookie Recipe for Decorating
Baking Techniques for Crisp, Delicious Cookies
Understanding the Basics of Cookie Baking
Cookie texture hinges on moisture content and how it evaporates during baking. The Maillard reaction—that magical browning process—creates complex flavors while sugars caramelize for depth. For crisp cookies, balance is key: enough moisture to develop structure initially, then sufficient baking to dry them properly. Understanding these chemical processes helps troubleshoot any texture issues that arise.
Flour Selection and its Impact on Texture
Flour protein content dramatically affects crispness. Bread flour's high protein creates chewiness, while pastry flour yields tender results. For maximum crispness, some bakers replace 10-15% of flour with cornstarch—it inhibits gluten formation while promoting delicate texture. Always sift flour with other dry ingredients; this incorporates air for lighter texture and prevents lumps that could create uneven baking.
Importance of Proper Chilling Techniques
Chilling does more than prevent spread—it allows flour to fully hydrate for consistent texture. For slice-and-bake cookies, freeze the log until firm, then slice while still cold for perfect rounds that hold their shape. Surprisingly, well-chilled dough often spreads less yet develops better flavor as ingredients meld. Don't skip this step even when pressed for time—15 minutes of chilling makes a noticeable difference.
Mastering the Baking Time and Temperature
The last few minutes of baking determine texture. Cookies may look underdone when perfectly baked—they continue cooking from residual heat after removal. For crisp edges with slightly soft centers, bake until edges golden but centers still appear moist. For uniformly crisp cookies, bake longer until the entire surface takes on color. Letting them cool completely on the sheet maximizes crispness as moisture fully evaporates.
The Role of Ingredients and Their Interactions
Granulated sugar promotes crispness by absorbing moisture, while brown sugar adds chewiness from its molasses content. For ideal texture, many bakers use a combination—the white sugar for crispness, brown for flavor and slight chew. Butter's water content also affects crispness; some professional recipes substitute a portion with vegetable shortening for more consistent results. Egg whites dry out cookies, while yolks add richness—adjusting this balance tailors texture perfectly.
Tips for Expert Sugar Cookie Decorations
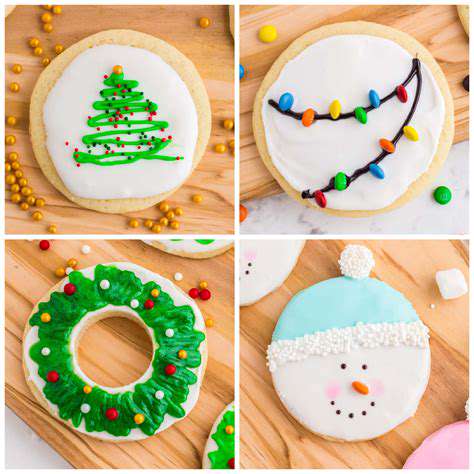
Mastering Royal Icing Techniques
Royal icing consistency is everything. The 10-second rule determines perfect flooding consistency—when a knife drawn through the icing leaves a trail that disappears in 10 seconds. For intricate details, use stiffer icing that holds peaks. Always keep bowls covered with damp towels—royal icing crusts over quickly. Pro tip: add a pinch of cream of tartar to prevent crystallization that can cause grainy texture.
Enhancing Your Cookie Base
A flawless canvas makes decorating easier. After baking, use a microplane to gently smooth any rough edges before decorating—this creates professional-looking results. For perfectly flat cookies, gently press down any domed centers immediately after removing from oven. Some decorators lightly sand cookies with fine sandpaper for an ultra-smooth surface that takes icing beautifully. These extra steps separate amateur from professional results.
Creative Design Ideas and Inspiration
Look beyond traditional designs for unique creations. Try watercolor effects by thinning food coloring with vodka and painting on dried icing—the alcohol evaporates quickly leaving vibrant color without moisture. Edible metallic leaf adds luxurious accent, while isomalt creates stunning transparent elements. For modern looks, try negative space designs or geometric patterns using stencils. The most memorable cookies often break traditional decorating rules.
Read more about Best Sugar Cookie Recipe for Decorating
![First Baby Food Recipes [Purees & Introducing Solids]](/static/images/28/2025-04/SafetyConsiderationsforBabyFoodPreparation.jpg)


Hot Recommendations
- Traditional Foods for Day of the Dead
- Food Etiquette in Italy: Pasta Rules!
- Best Family Friendly Restaurants with Play Areas in [City]
- Review: The Best [Specific Dessert] Place in [City]
- Top Ice Cream Parlors in [City]
- Traditional Foods for Halloween
- The History of the Potato in Ireland
- Best Vegan Pizza Joints in [City] [2025]
- Best Bakeries for Sourdough Bread in [City]
- Food Culture in Argentina: Asado and Wine