How to Make Easy Homemade Croutons
Baking the Croutons to Perfection
Oven dynamics significantly impact crouton quality. Preheating to 375°F (190°C) with convection (if available) creates the ideal crisp-to-chew ratio. The convection setting circulates air more efficiently, preventing steam buildup that can lead to sogginess. Position racks in the upper third of the oven where heat is most consistent for browning.
The flipping technique matters: use a thin metal spatula to turn cubes at the 6-minute mark, being careful not to crush them. This ensures all sides develop that coveted golden hue. Watch for visual cues - edges should be deep golden (not pale or dark brown) and surfaces should appear matte rather than shiny when properly dried. Underdone croutons continue to soften as they cool.
Storing and Using Your Croutons
Proper storage extends freshness dramatically. Line your airtight container with a paper towel to absorb any residual moisture, replacing it every 2-3 days. For long-term storage (up to 3 weeks), freeze croutons in a single layer before transferring to bags - they'll regain crispness at room temperature in minutes.
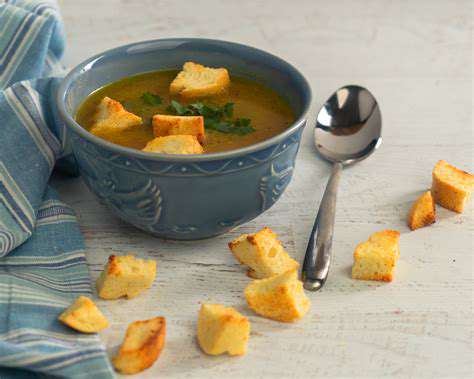
Beyond salads, these flavor-packed cubes elevate dishes unexpectedly: crush over roasted vegetables, use as a casserole topping, or blend into breadcrumbs for coatings. Their versatility makes batch preparation worthwhile. Interestingly, slightly stale croutons actually work better in soups as they maintain texture longer when submerged.
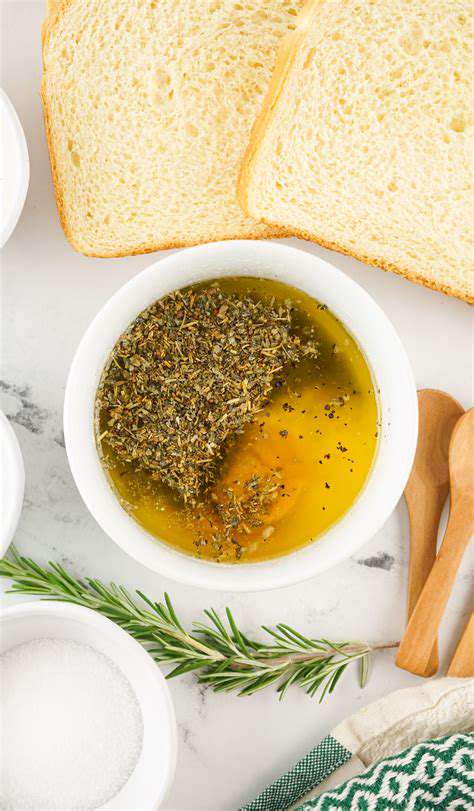
The Essential Crouton Seasoning: A Flavorful Fusion
The Allure of Savory Croutons
What makes croutons truly special is their textural alchemy. That satisfying audible crunch gives way to a slightly yielding interior - a contrast that activates multiple sensory receptors. This duality explains why they enhance everything from creamy bisques to delicate greens. Their porous structure also acts as a flavor delivery system, absorbing and releasing dressing components with each bite.
Historically, croutons originated as a practical solution for stale bread, but modern culinary applications have elevated them to a gourmet ingredient. Contemporary chefs now use them as vehicles for complex flavors, from truffle oil to za'atar. This evolution reflects their unique ability to bridge rustic tradition and modern gastronomy.
Crafting the Perfect Crouton Base
Bread selection requires considering final application. For Caesar salads, a dense Italian loaf provides structural integrity against creamy dressings, while airy baguettes work better floating in broths. An often-overlooked tip: remove most of the crust for more uniform browning, as crusts tend to darken faster than the crumb.
The drying stage before seasoning is crucial. Spread cubes in a single layer and let sit uncovered for 1-2 hours (or overnight in the fridge). This surface dehydration allows for better oil absorption and prevents steaming during baking. The difference is noticeable - properly dried cubes develop that professional-quality crispness throughout rather than just on the exterior.
The Importance of Precise Seasoning
Seasoning timing affects flavor potency. Adding salt immediately before baking draws out moisture, creating better texture, while dried herbs added mid-bake (at the flip point) retain more aromatic compounds. For garlic lovers, rubbing raw garlic on warm baked croutons infuses flavor without bitterness from burnt garlic powder.
Regional seasoning blends can transform croutons into global accents: try furikake for Asian salads, ras el hanout for Moroccan soups, or herbes de Provence for French onion soup. The key is matching intensity - delicate greens need subtler seasoning than robust minestrone. Always consider the whole dish's flavor profile when designing your blend.
Baking Techniques for Optimal Crispness
Temperature control makes or breaks croutons. Starting at 400°F (200°C) for 5 minutes then reducing to 325°F (160°C) creates an ideal crisp-chew balance. This two-stage approach quickly sets the exterior while gently drying the interior. Using a baking stone or steel helps maintain even heat distribution, preventing hot spots that cause uneven browning.
The doneness test professionals use: remove one crouton and let cool 30 seconds. Properly baked croutons will feel light and dry throughout when broken, with no soft or doughy center. They should shatter crisply when bitten but not taste burnt or bitter. This perfect state indicates all moisture has evaporated without caramelization going too far.
Adding Flavorful Extras
Infused oils take croutons to new dimensions. Steep garlic, chili flakes, or citrus zest in warm oil for 30 minutes before tossing with bread - this deepens flavor complexity without adding moisture. For cheese variations, add finely grated hard cheeses during the last 2 minutes of baking to prevent burning while ensuring proper melting.
Unexpected additions can create signature croutons: crushed nori sheets, matcha powder, or even finely ground coffee (for dessert applications). The rule of thumb: any dry ingredient that complements your dish can work, but add in small increments and taste as you go. Balance is key - the crouton should enhance, not dominate.
Storage for Optimal Freshness
Humidity is the enemy of crispness. Silica gel packets placed in storage containers absorb ambient moisture effectively, extending shelf life by several days. For bulk storage, vacuum sealing maintains texture for months, with quick refresh in a warm oven before use. Interestingly, storing different flavored croutons separately prevents flavor migration.
Reviving stale croutons is simple: spread on a tray and bake at 300°F (150°C) for 3-5 minutes. This reactivates the Maillard reaction compounds, restoring much of the original texture and aroma. For soup garnishes, a quick toast in a dry skillet works even faster, creating those perfect golden edges that stand up to broth.
Read more about How to Make Easy Homemade Croutons


![Review: [Specific Wine Bar Name] with Food Pairing](/static/images/28/2025-05/FinalThoughts3AAMust-VisitforWineEnthusiastsandFoodies.jpg)

![Best Mexican Restaurants in [City]](/static/images/28/2025-05/FineDiningMeetsMexicanFlair3AAnElevatedCulinaryExperience.jpg)
![Best Vegetarian Restaurants in [City]](/static/images/28/2025-05/LocalFavoritesandHiddenGems.jpg)