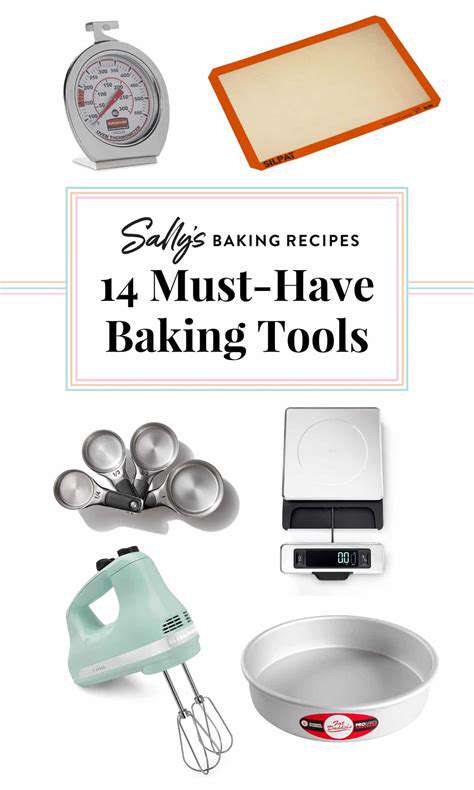
Essential Baking Tools for Beginners
Understanding Precision in Baking
Baking, when done right, resembles a carefully orchestrated chemical reaction. The difference between a perfect cake and a baking disaster often comes down to how precisely you measure your ingredients. Professional bakers know that eyeballing measurements simply won't cut it when consistency matters. Every gram counts when you're aiming for bakery-quality results in your home kitchen.
Consider flour as a prime example. Scooping directly from the bag can pack in up to 20% more flour than the recipe calls for. That innocent mistake could transform your light, airy cake into something resembling a brick. The solution? Always spoon flour into your measuring cup and level it off with the straight edge of a knife for true accuracy.
Accurate Ingredient Measurement Techniques
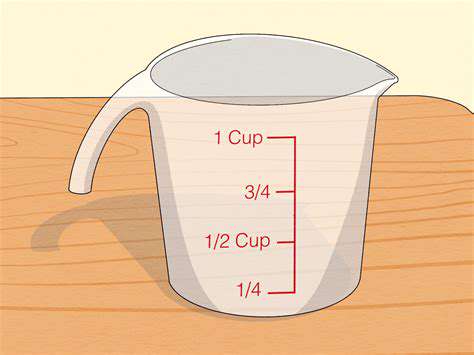
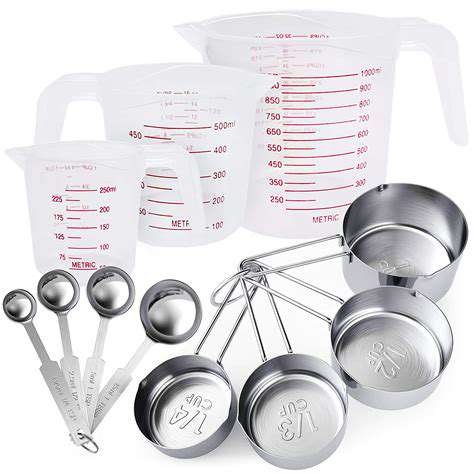
Let's talk tools. Those plastic measuring cups from the dollar store? They might be doing your baking more harm than good. Invest in sturdy, standardized measuring cups and spoons that won't warp over time. For liquids, use clear glass or plastic cups with measurement markings that go all the way to the top - no more guessing where the meniscus should line up.
Here's a pro tip most home bakers overlook: your measuring technique should change based on what you're measuring. Brown sugar gets packed firmly into the cup, while powdered sugar gets sifted first. These small but crucial differences separate adequate bakers from exceptional ones.
The Importance of Accurate Scales
If there's one tool that can revolutionize your baking, it's a good digital scale. Unlike volume measurements that can vary wildly, 200 grams of flour is always 200 grams. Professional kitchens have relied on scales for decades because they remove all the guesswork from baking. Modern home scales are affordable, precise to the gram, and often come with handy features like tare functions.
Scales shine when working with ingredients like honey or molasses that are messy to measure in cups. Just place your mixing bowl on the scale, hit tare to zero it out, and pour directly until you hit the right weight. Clean, simple, and incredibly accurate.
Oven Temperature Control
Your oven might be lying to you. Most home ovens run hot or cold by as much as 25°F, yet few bakers think to check. An inexpensive oven thermometer can reveal the truth about your oven's actual temperature. That discrepancy you've noticed between baking times in recipes and your own experience? It's probably your oven's fault.
Choosing the Right Measuring Tools
Not all measuring tools are created equal. Look for cups and spoons that meet ASTM or ISO standards - these undergo rigorous testing to ensure accuracy. Stainless steel options resist warping and last for decades. For liquid measures, choose options with clear, easy-to-read markings that won't rub off with washing.
One often-overlooked tool? A good bench scraper. It's perfect for leveling off dry ingredients and makes cleanup a breeze. These small investments in quality tools pay dividends in baking consistency.
Understanding Recipe Conversions
Scaling recipes up or down requires more math than you might think. Doubling a recipe isn't as simple as multiplying everything by two - leavening agents often need adjustment. This is where understanding baker's percentages becomes invaluable. By expressing ingredients as percentages of the total flour weight, you gain incredible flexibility in recipe adjustment.
Metric measurements make scaling particularly easy. Working in grams allows for precise adjustments that would be impossible with cup measurements. Once you start thinking in weights rather than volumes, a whole world of baking precision opens up.
Maintaining Consistency for Optimal Results
Consistency separates hobby bakers from professionals. It's not just about following recipes - it's about developing repeatable processes. Keep a baking journal noting exact measurements, oven temperatures, and results. Over time, you'll identify patterns and learn exactly how your kitchen environment affects your baking.
Pay attention to environmental factors too. Humidity can affect how flour absorbs moisture, and altitude changes baking chemistry. The more variables you control, the more consistent your results become.
Mixing and Combining: Mastering the Art of Incorporation
Understanding the Fundamentals of Incorporation
Think of incorporation as building the framework for your baked goods. Each mixing method develops specific structures that determine texture. Creaming creates air pockets for lift, while folding preserves delicate bubbles. Choosing the wrong method can collapse all your careful measuring work in seconds.
Temperature plays a crucial but often ignored role. Butter at 65°F creams perfectly, while cold butter won't incorporate properly. Eggs incorporate best at room temperature. These small details make big differences in your final product's texture.
Creaming: The Foundation of Many Recipes
Proper creaming is an art form. The goal isn't just to mix butter and sugar, but to trap millions of microscopic air bubbles. Under-creaming leaves cakes dense, while over-creaming can cause collapse. The sweet spot? When the mixture turns pale yellow and forms soft peaks when you lift the beater.
Modern bakers debate paddle vs. whisk attachments for creaming. While whisks incorporate more air, paddles give more control. Experiment with both to find what works best for your recipes and equipment.
Whisking: Lightening and Incorporating Air
Whisking does more than mix - it physically alters ingredients. Egg whites transform from clear liquid to white foam because whisking unravels proteins that then trap air. The bowl's material matters too. Copper bowls stabilize egg whites best, while stainless steel offers durability for everyday use.
Watch for visual cues when whisking. Egg whites are ready when they form stiff peaks that don't droop. For whipped cream, stop when it holds soft peaks - any further and you're making butter.
Folding: Gently Incorporating Air and Ingredients
Folding is baking's most delicate dance. Use a wide, flexible spatula and cut through the center of the bowl, bringing the bottom up and over. Rotate the bowl slightly with each fold to ensure even mixing. The goal is to combine without deflating - stop when you still see a few streaks of unmixed ingredients.
Timing matters too. Fold dry ingredients into wet just until combined, then immediately transfer to pans. Letting batter sit allows gluten to develop, leading to toughness.
Sifting: Ensuring Even Distribution and Texture
Sifting does triple duty: it aerates, combines, and removes lumps. For ultra-fine textures, sift twice - once before measuring and again with other dry ingredients. Modern bakers debate sifting necessity, but it's essential for delicate cakes and when using almond flour or cocoa powder.
Don't have a sifter? A fine-mesh strainer works nearly as well. The key is gently tapping rather than forcing ingredients through, which preserves that crucial airiness.
Using the Right Tools for the Job
Your tools should match your mixing method. Flexible silicone spatulas excel at folding, while stiff scrapers work better for heavier doughs. Consider investing in a Danish dough whisk for bread doughs - its unique design combines ingredients without overworking.
Stand mixers offer convenience, but don't underestimate hand mixing. Many professional bakers mix certain items by hand for better control, especially when working with delicate ingredients.
Understanding Ingredient Properties
Flour isn't just flour. Cake flour's low protein content creates tenderness, while bread flour's high protein develops gluten structure. Substituting one for the other without adjustment guarantees disappointing results. Even different brands of the same flour type can behave differently based on protein content and milling process.
Liquids matter too. Water develops gluten more than milk, while fats like oil or butter inhibit gluten formation. Understanding these interactions lets you predict and control your baked goods' texture.
Beyond the Basics: Helpful Extras
Understanding Advanced Search Operators
Search engines are powerful tools when you know how to speak their language. The site: operator is particularly useful for baking research. Try site:.edu baking science to find academic resources, or site:.uk scone recipes for British baking expertise. This simple trick filters out commercial sites and gets you straight to authoritative sources.
Date range searching solves another common problem - outdated information. Adding after:2020 to your query ensures you're getting current techniques and food safety recommendations. This is especially important when researching topics like sourdough starters where best practices evolve.
Optimizing Your Search Strategy
Think like a librarian when searching. Start broad, then narrow using the most relevant terms from your initial results. For example, begin with cake troubleshooting, then drill down to genoise collapse causes once you identify your specific issue.
Don't overlook image searches for visual guidance. Searching laminated dough layers with image results shows exactly what proper lamination should look like at each stage. This visual confirmation complements written instructions perfectly.
Leveraging Specialized Databases
Many professional baking organizations offer member databases with tested recipes and techniques. While some require membership, others like the King Arthur Baking School resources are freely accessible. University extension programs often publish research on food science that's invaluable for serious bakers.
Don't forget international resources. The French National Institute of Baking (INBP) publishes English translations of many technical documents. These provide insights into traditional techniques that have been perfected over centuries.
Utilizing Citation Tools for Research
When you find a reliable source, chase its references. Scholarly articles about baking science often cite foundational research that's even more valuable. Google Scholar's cited by feature reveals newer research building on older studies, creating a web of connected knowledge.
Staying Updated on Relevant Trends
Subscribe to trade publications like Modern Baking or Baking Business for industry trends that eventually trickle down to home bakers. Follow food scientists on social media - they often share cutting-edge techniques years before they appear in cookbooks. Many culinary schools now post lecture videos online, offering free access to professional-level instruction.
Set up Google Alerts for topics like baking science breakthroughs or new pastry techniques. This passive learning approach delivers relevant updates straight to your inbox without active searching. Over time, you'll develop an impressive knowledge base almost effortlessly.
Read more about Essential Baking Tools for Beginners

![Review: [Specific Wine Bar Name] with Food Pairing](/static/images/28/2025-05/FinalThoughts3AAMust-VisitforWineEnthusiastsandFoodies.jpg)
![Best Mexican Restaurants in [City]](/static/images/28/2025-05/FineDiningMeetsMexicanFlair3AAnElevatedCulinaryExperience.jpg)

![Healthy Meal Plan for Weight Loss [7 Day Guide]](/static/images/28/2025-05/Day53AAFocusonFiberandHydration.jpg)
Hot Recommendations
- Traditional Foods for Day of the Dead
- Food Etiquette in Italy: Pasta Rules!
- Best Family Friendly Restaurants with Play Areas in [City]
- Review: The Best [Specific Dessert] Place in [City]
- Top Ice Cream Parlors in [City]
- Traditional Foods for Halloween
- The History of the Potato in Ireland
- Best Vegan Pizza Joints in [City] [2025]
- Best Bakeries for Sourdough Bread in [City]
- Food Culture in Argentina: Asado and Wine